📌 Tutorial: Build a Weekly Planner Dashboard in Wavebox

Staying organized throughout the week doesn't have to mean juggling multiple apps and browser tabs. With Wavebox Dashboards, you can create a beautiful, customizable weekly planner that keeps all your tasks, notes, and links in one place—right in your browser.
🤔 Already using a Chrome extension? There are so many benefits of using Dashboards instead:
- Always up to date — updated at the same time as Wavebox.
- More control over where Collection shortcuts open.
- Create multiple new tab pages.
- Multi-account (Space) support for notification widgets.
- Wider variety of widgets and custom options.
Not just for new tabs! You can use Dashboards to bring together all your scattered web resources. Whether you're planning your work week, organizing personal projects, or managing team schedules, this tutorial will show you how to build a Weekly Planner Dashboard from scratch. Let's dive in!
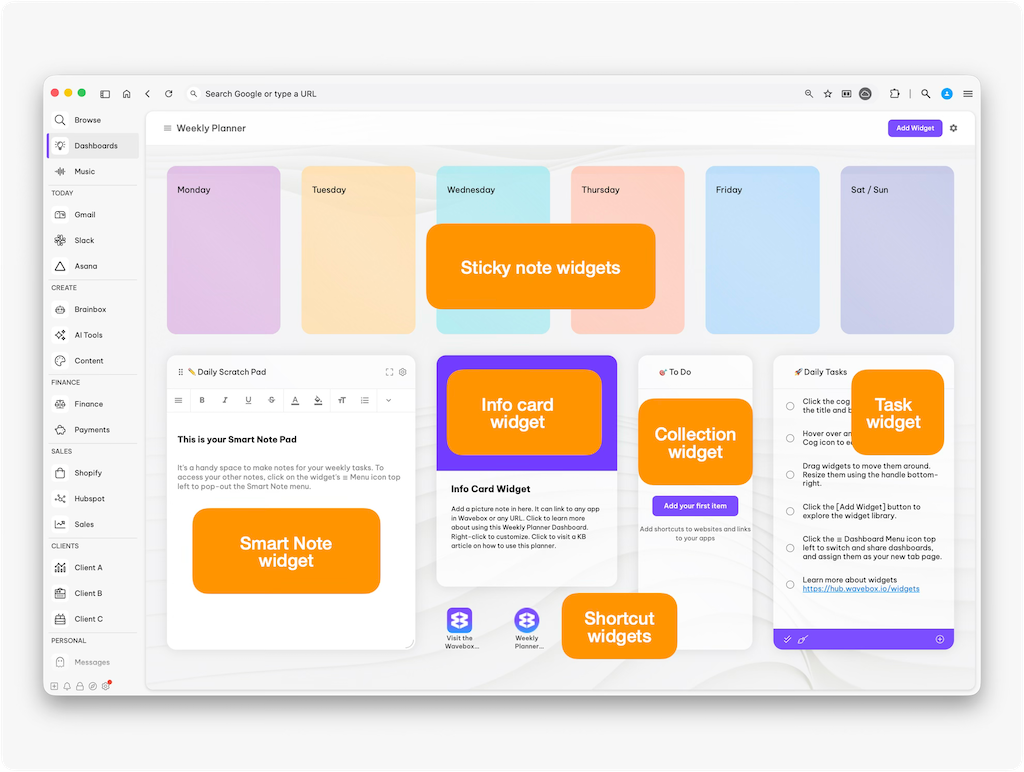
What You'll Create
Your Weekly Planner Dashboard will include:
- Color-coded daily cards for each day of the week.
- A Daily Scratch Pad for quick notes and brainstorming.
- Task widgets to track your to-dos and daily priorities.
- Quick-access links to your favorite planning resources.
- Collection widgets for easy access to related apps and tools.
Then you can:
- Set it as your new tab page across all Spaces, groups, and apps.
- Set it as your new tab in a specific Space, e.g., Client A Weekly Planner in the Client A Space.
Step 1: Create Your Dashboard
First, let's set up a new dashboard for your weekly planner.
How to do it:
- Click + in the webdock or group tabstrip.
- Search for "Dashboard" in the App Directory.
- Click the four-squares icon to add a Dashboard.
- Name it something like "Weekly Planner" or "My Week at a Glance."
💡 Tip: You can create multiple dashboards for different purposes—one for work, one for personal planning, or separate ones for different projects or clients. All your dashboards are available from the ☰ Dashboard Menu (top left).
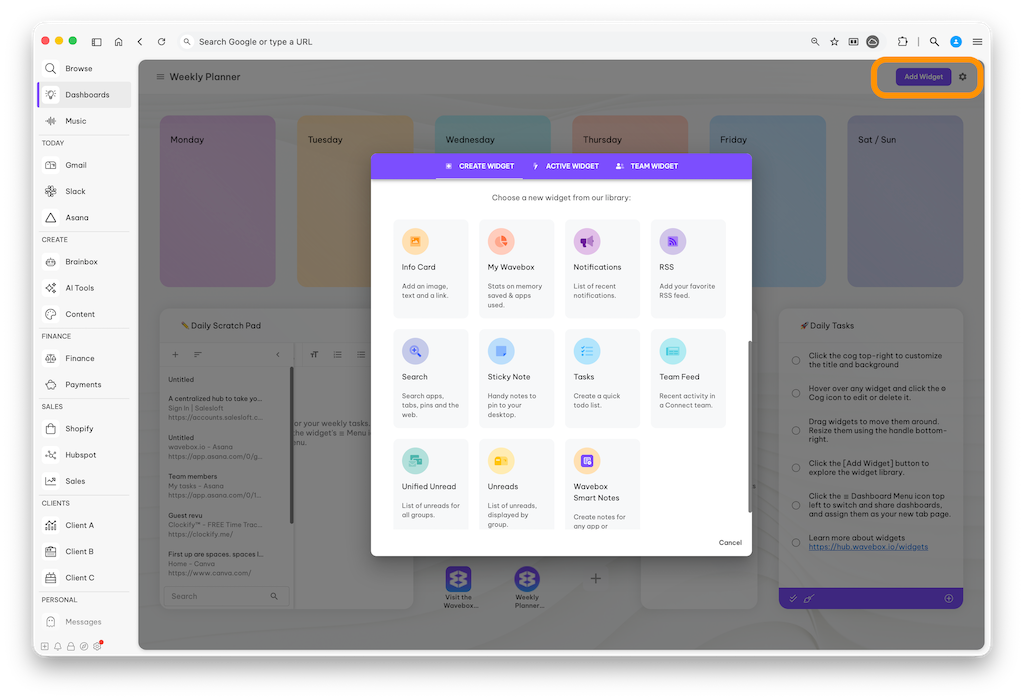
Step 2: Add your Widgets
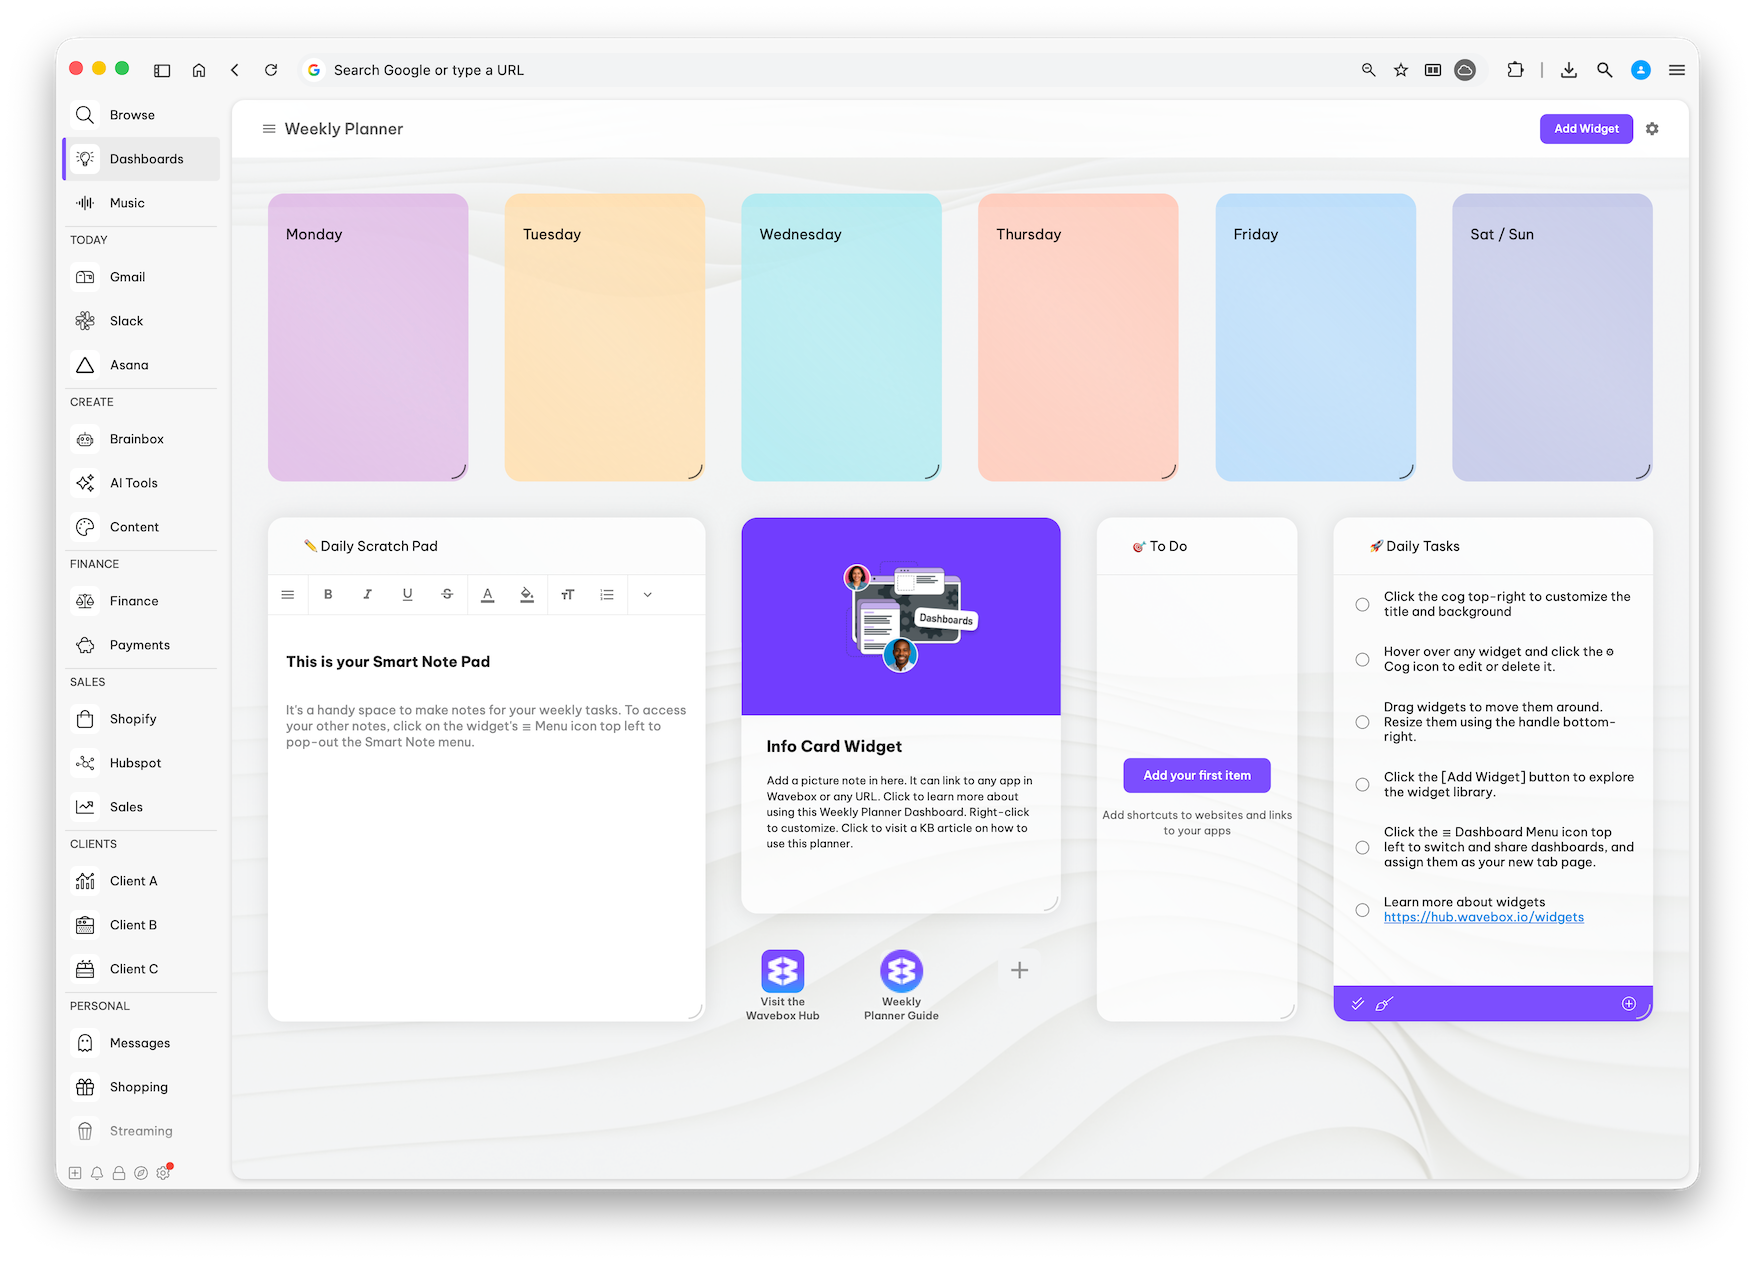
📌 Create Your Weekly View with Sticky Notes
The centerpiece of your planner is a row of sticky-note widgets—one for each day of the week—giving you a visual overview of your entire week.
How to do it:
- Click [Add Widget] in the top-right corner.
- Browse the widget library and select the 'Sticky Note' widget.
- Add six sticky-note widgets across the top of your dashboard.
- Resize them to be the same size for a clean, organized look.
Customize each day:
- Click on each widget and type: Monday, Tuesday, Wednesday, Thursday, Friday, and Sat / Sun.
- Hover over the sticky note header to edit it:
- Click the palette icon to change the background color for each day to create a color-coded system (for example: purple for Monday, peach for Tuesday, teal for Wednesday, coral for Thursday, blue for Friday, lavender for weekend).
- Click the 'A' icon to change the font size.
- Drag and arrange them in a row across the top of your dashboard.
🙌 Did you know? Most dashboard widgets can be popped-out and placed on your desktop, so you can use them when you're not using Wavebox.
📝 Add a Scratch Pad using Smart Notes
A scratch pad is perfect for capturing quick thoughts, daily priorities, or brainstorming ideas.
How to do it:
- Click [Add Widget] again.
- Select the Smart Notes widget from the library.
- Position it below your weekly view on the left side.
- Start a new Note and call it "Scratch Pad" or "Quick Notes".
- Or create a new note for each day.
📍 Pro tip: Click on the widget's ☰Menu icon to access your other notes from the Smart Note menu.
What makes it useful: The Smart Notes widget includes basic text formatting (bold, italic, underline, lists) so you can organize your thoughts. It's perfect for:
- Morning brain dumps.
- Meeting prep notes.
- Ideas you want to capture quickly.
- Daily affirmations or focus themes.
🔗 Add Individual Shortcuts
Kickstart important workflows by creating individual shortcuts to an app or website you use regularly.
How to do it:
- Click [Add Widget]
- Select App or Link widget from the library.
- A blank icon will appear on the dashboard with a + plus on it.
- Click the icon and add your link.
🔗 Add a Collection Widget
Keep track of your important links, resources, and shortcuts with a Collection widget. They're basically shortcuts to files and websites you need on a daily or weekly basis.
How to do it:
- Click [Add Widget]
- Select the Collection widget from the library.
- Position it on the right side of your dashboard.
- Rename it "To Do" or "Quick Links."
Getting started:
- Click [Add your first item] to add a shortcut.
- Add links to apps you already have in Wavebox.
- Add websites, apps, documents, or any URLs you need quick access to.
Use this collection for:
- Important project links.
- Frequently accessed documents.
- Client portals or team resources.
- Tools you use daily.
✅ Add a Daily Tasks Widget
For tracking your actual to-dos and checking off completed items, add a Tasks widget.
How to do it:
- Click [Add Widget].
- Select the Tasks widget from the library.
- Position it next to your To Do Collection widget.
- Rename it "Daily Tasks" or "Today's Focus".
- Add your tasks!
Use this widget for:
- Tasks specific to the current day (or for the week).
- Quick wins you want to accomplish today.
- Items you can check off as you complete them.
- Time-sensitive priorities.
- Recurring daily habits.
💡 Tip: You can drag tasks up/down in the list to reorder them. You can also drag tasks from one widget to another!
📸 Add an Info Card Widget
The Info Card widget is a great way to display important information, quick tips, or links to guides. Or use it to brighten up your dashboard with a picture of your work bestie, favourite pic, or a cute pet! 🐾
How to do it:
- Click [Add Widget]
- Select the Info Card widget from the library.
- Position it in the center of your lower dashboard area.
- Click the [Customize] button to add a photo, header and text.
What to include:
- A picture or illustration (upload from your computer).
- Link to any app in Wavebox or external URL.
- A title and some descriptive text.
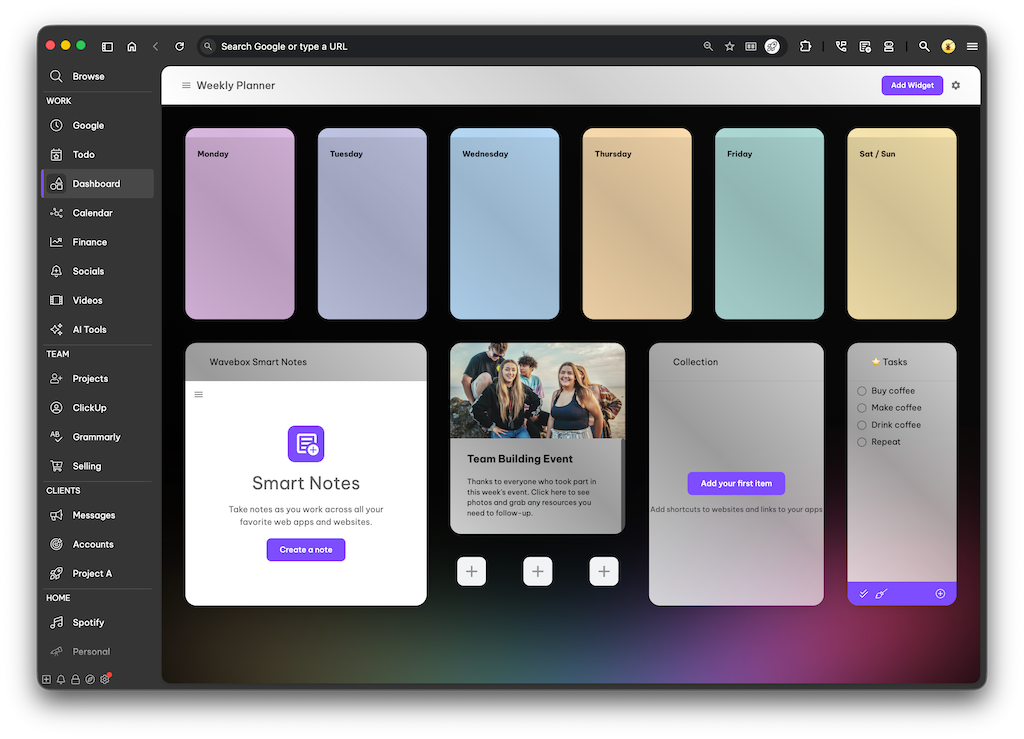
Step 3. Personalize Your Weekly Planner
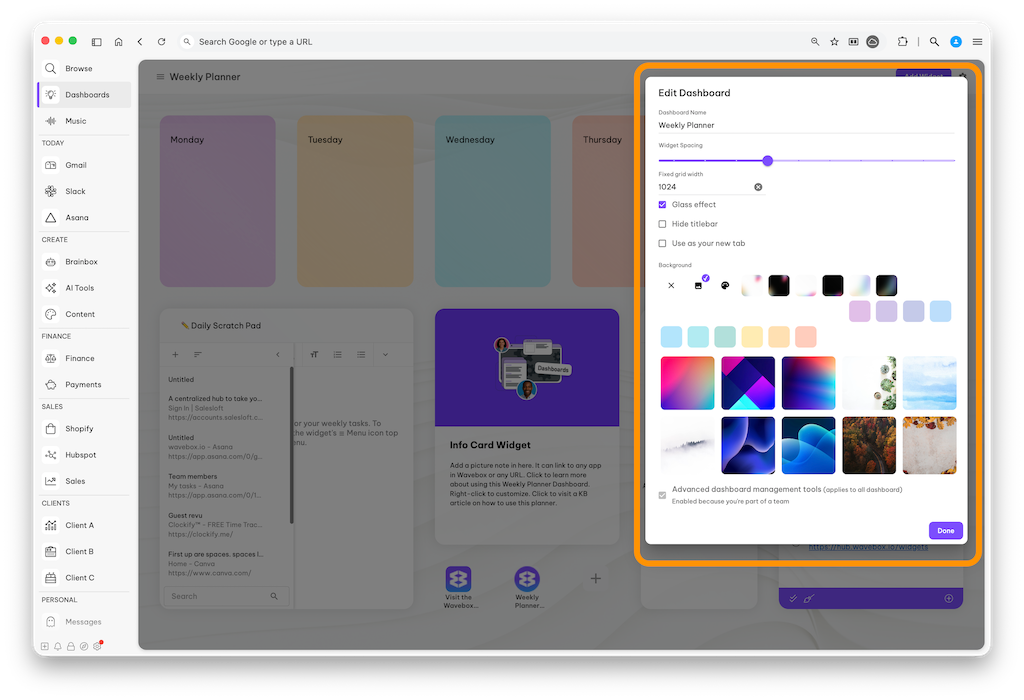
Now that your dashboard is built, make it uniquely yours!
Adjust spacing and layout:
- Click the ⚙ Settings Cog in the top-right corner.
- Use the slider to adjust the space between widgets.
- Enable the Glass effect for a sleek, semi-transparent look.
- 🔥 Lock the size - useful if you're using a smaller screens.
Change the background:
- Click the ⚙ Settings Cog in the top-right corner.
- Choose a background or upload your own image.
- Choose colors that match your workflow, mood or groups colors!
Rearrange and resize widgets:
- Drag widgets to move them around until you find the perfect layout.
- Resize widgets by dragging the bottom-right corner.
Hide the titlebar:
- If you want more screen space, check the box to hide the Dashboard titlebar.
Step 4: Setup as your New Tab page
✅ Can't see the ☰ Dashboard Menu icon? You need to enable advanced settings first. Go to Settings > General Tab > Settings Mode (at the top) > Enable Advanced Mode > Toggle ON.
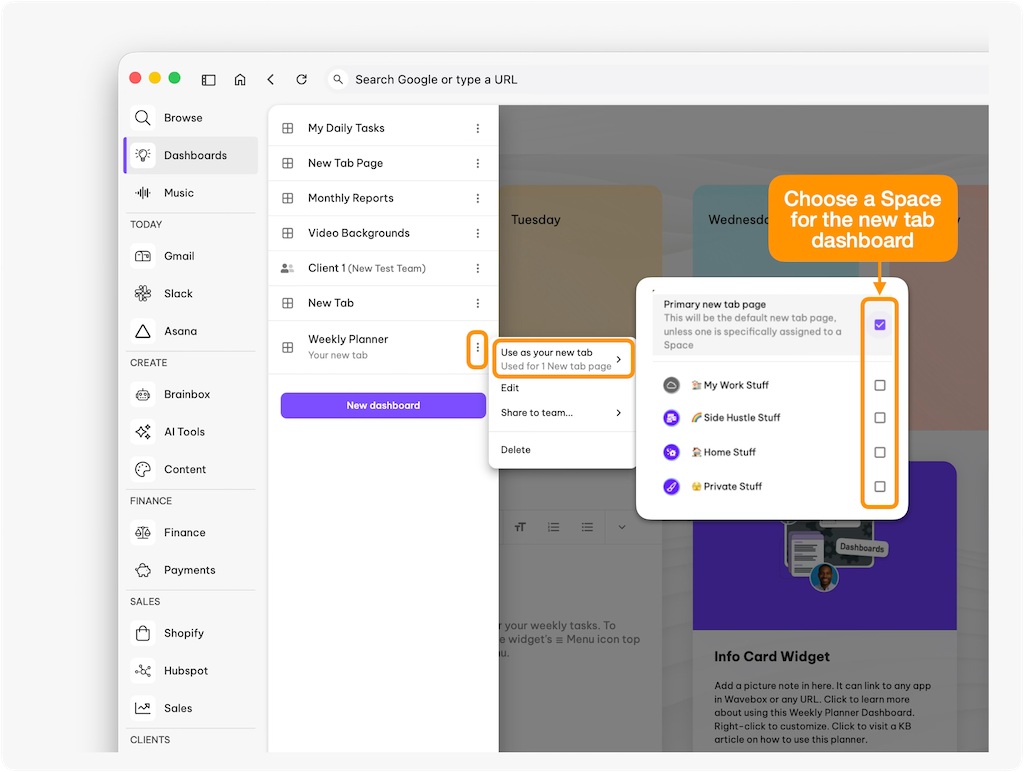
Your dashboard is looking great, so you'll want easy access to it from anywhere in Wavebox. Good news! There are some easy ways to use your creation:
- Click the Dashboard Menu (≡) top left.
- Hover over the dashboard name, and click the ⋮ kebab menu.
- Hover over 'Use as your new tab'.
- ✅ Check the box to use it as your new tab page for all Wavebox.
- ✅ Check the box to use it as your new tab in a specific Space (e.g. Client A Weekly Planner in the Client A Space.
- Every time you open a new tab, your Weekly Planner will appear.
That's all there is to it!
Now you can create a weekly planning dashboard that fits your workflow and use it for one week—then tweak. With color-coded daily cards, a scratch pad for quick thoughts, and task and collection widgets all in one place, your Weekly Planner reduces context-switching, speeds up daily decision-making, and helps you focus on what matters most.
🍎 Learn more about Dashboards here!
Whether you’re planning solo work or coordinating a team, set this dashboard as your New Tab and make a 10–15 minute weekly review part of your routine. You’ll gain clarity for the week ahead — and save time every day.